Swift Fox 19 will be held at D-Day Adventure Park, near Wyandotte, Oklahoma. An address suitable for mapping and car nav systems is:
D-Day Adventure Park
66800 E 175 Rd
Wyandotte, OK 74370
Google, and most online mappingsystems, tend to take you slightly twisty, dark, dangerous, and dumb ways. Sometimes, across things like low crossings that may even be flooded and impassable. So instead, attached and discussed here is the suggested route.
Here's where the park is relative to the local highways. The best Kansas City route comes down OK-137, through the small Twin Bridges State Park:
Note the south end of the State Park is quite twisty and steep, so if driving a large vehicle, slow down. It's entirely passable in all vehicles, but do take it slower.
Once you get past the State Park, the easiest way to get to the field is to turn south off US-60 onto OK-10. Take the first left (it's a little ways down there) onto E 160 Road. Turn right across a bridge briefly onto N 670 Road, then left onto E 166 Road, till it dead ends. Turn right (onto Cayuga Road) and look for the large sign indicating D-DayAdventurePark to the right.
Once on site, we'll all be checking in at the same location, probably in a large shed next to the D-Day Cafe. Check the map, but you won't be able to miss us.
Signs will be posted for parking, but we aren't going to separate each army's parking and camping. Once checked in, we will load up in slightly separate locations, so please do not go into your opponent's assembly area after check in.
Try to park in neat rows, and look carefully at where you have parked. Make sure you aren't blocking others in, or restricting access to buildings, equipment or for other vehicles such as tractors or trucks. Do not block garages, or roadways. Some of these not only will be used by the field staff, but may even be needed for our game so you will slow things down.
There are large parking areas available if you have an oversized vehicle or need to unload a trailer. Do not try to bring it into the labeled parking area, but use the space to the south, in front of the check in building. There is RV camping, so do not run down the hookups when turning a large trailer. Ask if you need assistance or instructions.
You are free to camp overnight Thursday. Tents will be to the east of the entry road, in the mowed area with fire rings. If you are bringing an RV, contact us to arrange parking and hookups with the field owner.
Try to keep quiet during camping, or overnight arrivals. Many people will be resting from long drives, and we all need to get up real early to get ready.
We are all camping together. We'll slightly separate the two teams around check in time, but until then you can mix. Team Leaders, be sure to keep any secret equipment, and discussions of plans, callsigns, etc. to yourselves.
Please make sure campfires, are only in existing fire rings (there are a few in the camping area) and be sure to put them out fully before you go to sleep. Take your tents down in the morning, and stow them and any other equipment you are not bringing in your vehicles to avoid damage from animals, weather, or just theft. Pick up all your trash, and place it in dumpsters or stow it in your vehicles for after the event as well.
There are many buildings, vehicles and other equipment on site. Don't mess with any of it unless we tell you specifically that you may.
Also, do not explore outside this area, and especially do not go wandering off onto the field, as parts may be actively used for off-roading, paintball, or live fire shooting until our event starts.
You may download a print-friendly version of the maps above at: http://centralwar.com/downloads/EventDocs/DDAP%20-%20Field%20Directions%20-%202019.pdf
In the vehicle post a few days ago we mentioned the need for a steel can so you can deploy marking smoke for damaged or destroyed vehicles. That's new, and everyone should know why, when they see a smoking vehicle.
We will issue both black and white smoke grenades to each vehicle. Stow them somewhere safe, where they won't get wet, crushed, or overheated.
Depending on the damage to the vehicle in the Vehicle Hit Effects book, you will deploy one of them to indicate what happened. White smoke will indicate damage, and looks like a small electrical fire or a major coolant leak, especially since during repair the hood should be raised.
Black smoke indicates a kill, and looks like the vehicle is on fire.
This is all about improving the war gaming simulation. Smoke drifting across the battlefield always helps with the realism, but it also allows everyone to tell at a glance the status of the vehicle.
A teammate seeing the smoke at a distance knows something happened and whether it is a kill or not. They can tell if they should rush over to help, or everyone is dead and they need to take other actions.
Attackers can see the results of their work, and know if they need to move in to finish the job or not.
The red flag is still used, from the time the vehicle is hit, right through to when the vehicle is resurrected.
Placement of the smoke based on wind etc can change how it looks up close - but at a distance is not that big a concern - the idea is that there is smoke pouring from the vehicle somewhere.
But it can make it look cooler if placed just right ;-)
One caution on placement: make sure that the outlet to the smoke is not pointing at any part of the vehicle. It can get hot so cause damage, so avoid mechanical components, antennas, plastic, and glass especially. It also will eject powdered smoke particles which can permanently stain a small area of the vehicle.
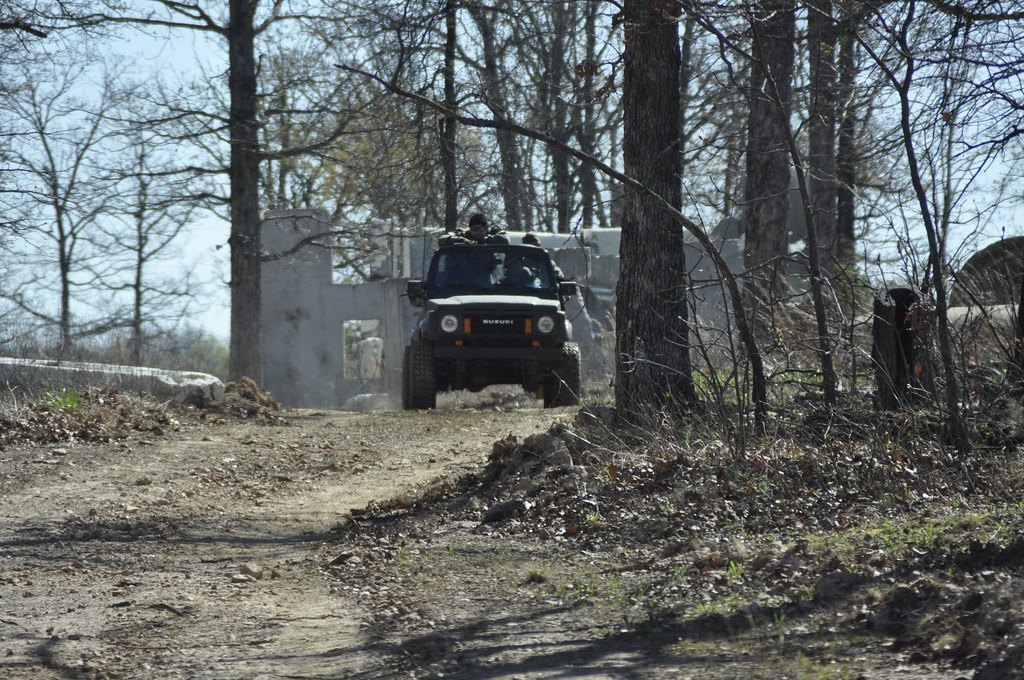
We usually provide a few vehicles for CWG events, and encourage participants to bring their own as well. But, only if appropriate, safe, and used correctly.
Vehicles are supplied or permitted at CWG events based on the mission and terrain. Sometimes the mission for that event does not require vehicles or the location and terrain make vehicles mostly useless. If your team is performing a very sneaky patrol or going to mostly set up an OP, vehicles would not fit this mission at all.
Unlike our uniforms, weapons, or many other pieces of equipment, there are many options for vehicle types, makes, and models. CWG core events always use two fictional third world armies. In the real world, countries with this degree of funding do not buy large quantities of modern vehicles, and do not replace them regularly.
Therefore, almost any military vehicle, and many civilian vehicles, may be encountered. As long as the vehicle is serviceable, complete, safe, and fits the mission profile. Age doesn't even matter, as there are real-world armies using World War II vintage vehicles today.
Civilian or commercial vehicles may also be used, but must again fit the mission profile. Usually, only 4x4—off-road capable—utility vehicles, trucks, or pickup trucks are usable.
Vehicles Are What They Are
Vehicles will not be simulated or modified; plywood and green paint on a van does not make it a tank. All vehicles will be as they actually are and may not purport to be something else. If you drive a pickup truck, regardless of what color you paint it, it will not be an armored vehicle unless it actually is armored.
Armored or uparmored versions of vehicles must carry actual plate of some sort to get the effect of the armor. Armor is only effective over the covered area; open top vehicles, opened hatches and vision ports will be unarmored areas, just like they would be in reality.
At Least Four Wheels and a Seat
At this time, no quad bikes, ATVs or motorcycles may be used. This is due to the higher risk of injury when using such vehicles; we do not have a driver certification program, so cannot guarantee you are a good driver, or have a method of assuring who is driving any vehicle. Off road only utility vehicles with seats, like the Gator, are generally permitted.
Bringing Your Own Vehicle
If you want to use your vehicle for a CWG event, first please contact us to discuss. We want to make sure it meets all requirements, and is integrated into the event plan, before you spend the time and effort to bring it down.
Also keep in mind that items used in the field are not quite yours personally. The vehicles will be assets to be used by your side. This does not mean we will force you to let others drive, but that you will be tasked as needed for the event, so must carry out missions, and accept cargo or troops to be carried. It is not just a free for all, four-wheeling event.
Your vehicle may be critical to some operations. If you are killed, busy, or simply tired, it would be good if it could be used anyway. Consider training others such as friends you come with in how it works, so you can permit them to use it as well.
Your vehicle may be shot by BBs, foam rockets, or other inert projectiles such as chalk TAG rounds. While everybody works to keep the potential damage low, things do happen. Dents to body panels, and radiators are common. We can advise on methods to protect the most delicate items, but minor damage is likely to occur,
Likewise, the terrain at many CWG events is rough so the vehicle needs to be able to handle that. It should not get stuck, or break due to driving over rocks. Often, branches intrude upon trails, so will scratch the sides of the vehicles a well.
If your vehicle has limits over what terrain it can safely cover, be sure to discuss that with us, and your chain of command, so it can be assigned for only missions it can perform successfully.
You will need to apply the magnets provided by CWG to allow identification of your vehicle. They must stay on the entire time, and cannot be removed to pretend to be an enemy vehicle or to remove yourself from the action.
CWG will provide on field refuel. There is no need for you to bring many fuel cans, or drive into town to refuel. We will determine your vehicle's needs when you discuss with us.
Be prepared in the event your vehicle manages to break down enough it cannot be driven home. If you drive the vehicle to the event, have contingency plans for friends to take you home, for example. The event field can store vehicles for a long time, so it's permitted—and safe—to leave it for later repair or recovery on the field.
Marking Vehicles
Just like all military equipment, our vehicles are clearly marked to indicate their nationality and unit. We provide temporary markings you can apply and remove easily.
The main markings will be national insignia. These generally go on the doors on each side. vehicles without doors can make other arrangements, such as the hood or a side panel next to the door.
If you vehicle is not an obviously military vehicle, it may be badged as a Frontier Police vehicle. This is not always the case but is a likely one depending on the mission and event.
Solid color vehicles are strongly preferred, and the magnets are all currently set up for white vehicles. Ideally, other marks such as 4x4 stickers are removed or obscured.
For these types of vehicles you may also have full color national flags, whether or not also marked as Frontier Police.
Finally as seen in the above we have vehicle numbers as well as magnets. These provide a unique vehicle ID, but can also be used to cover up other insignia or badges, in case you vehicle has something specifically not applicable to the event, such as other unit markings, or flags.
We also have some blank magnet panels if you have even more markings to cover.
Your vehicle should have all normal safety equipment, such as a fire extinguisher, and some tools to help extract from being stuck. To indicate hits, you also must have a red flag, and a can to hold smoke grenades.
CWG will supply the black and white smoke grenades, as well as a vehicle kill booklet indicating when to use them.
The can is to ensure that the smoke grenade does not cause a fire on the ground nor damage the vehicles. It may be secured to your vehicle, or can be removable (such as by magnet) but it will need to be able to attach to your vehicle when deploying the smoke.
If you have any other questions on vehicle use at CWG events, please don't hesitate to contact us.
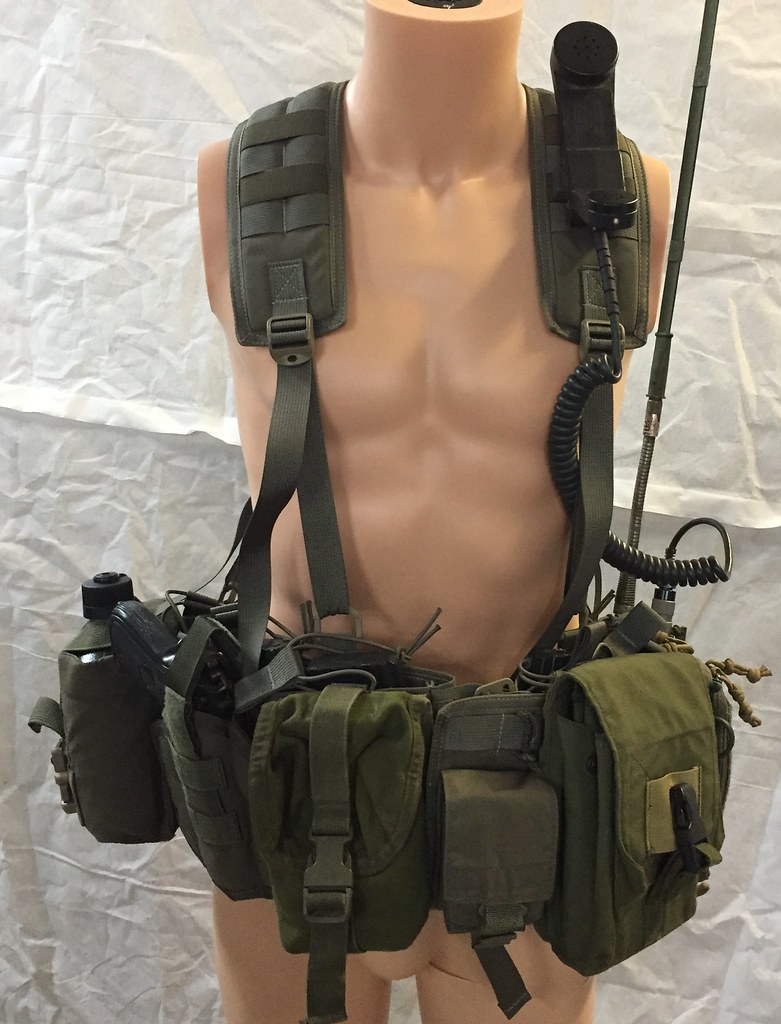
Brett recently wrote about a custom chest rig he had made by Kennedy Nylon Designs, and has done some additional changes to it:
I had mentioned that I would be getting a pouch made for my map case specifically.
I also had some improvements I wanted based on my needs.
First, I realized that the mag retention was not my favorite so I looked at options and settled on the
Esstac kydex inserts (5.56) (7.62).
I had KND make me new mag pouches that were open on the bottom, with Velcro inside to retain the inserts. The 5.56 ones were made in 2-mag pairs instead of 3, to allow me to adjust my setup more.
Finally I wanted to use the remaining space in the rig for some pull out pouches, so I had KND make some pouches with Velcro to fit a couple pouches I wanted to use.
And here is how things look all put together with 5.56 mags. I have it set up where 4 mags are on my
left side and 2 more right of center. For me this works best since I am right handed so grab mags with
my left hand to reload.
The new pull out pouches go on right side behind the mags.
Sometimes you just have to get something made, as nothing off the shelf meets all your needs or wants.
I have used the 2-piece MAV from Tactical Tailor and it filled most of that list—but there were a few things lacking. I was using the center adapter and X-harness. and then finding various pouches I needed. It mostly ended up being mag pouches, which took a lot of the real estate on the MAV body itself.
More recently I got a S.O.Tech MACHS, a special operations medical setup of their longstanding Hellcat, as reviewed by Steven a few years back. This got rid of some of the issues of space and adaptability, as it provided for internal mag pouches. The front is then blank MOLLE, giving me more real estate for any other pouches. However it only worked for 5.56 mags. In addition, the center closure was not great, with velcro and snaps. When full of mags it pulled open easily.
Steven has modified his to solve some of these issues, but by the time I considered that level of modification, I decided I'd be better off just having exactly what I wanted made instead.
I had been watching the rigs made by Kennedy Nylon Designs, so contacted him and we worked through my needs, and the details of what that would involve. I wanted to stick to the front-opening chest rig like the S.O.Tech or 2-piece MAV, but with my add-on PALS over the attachment to loose no real estate.
And he delivered!
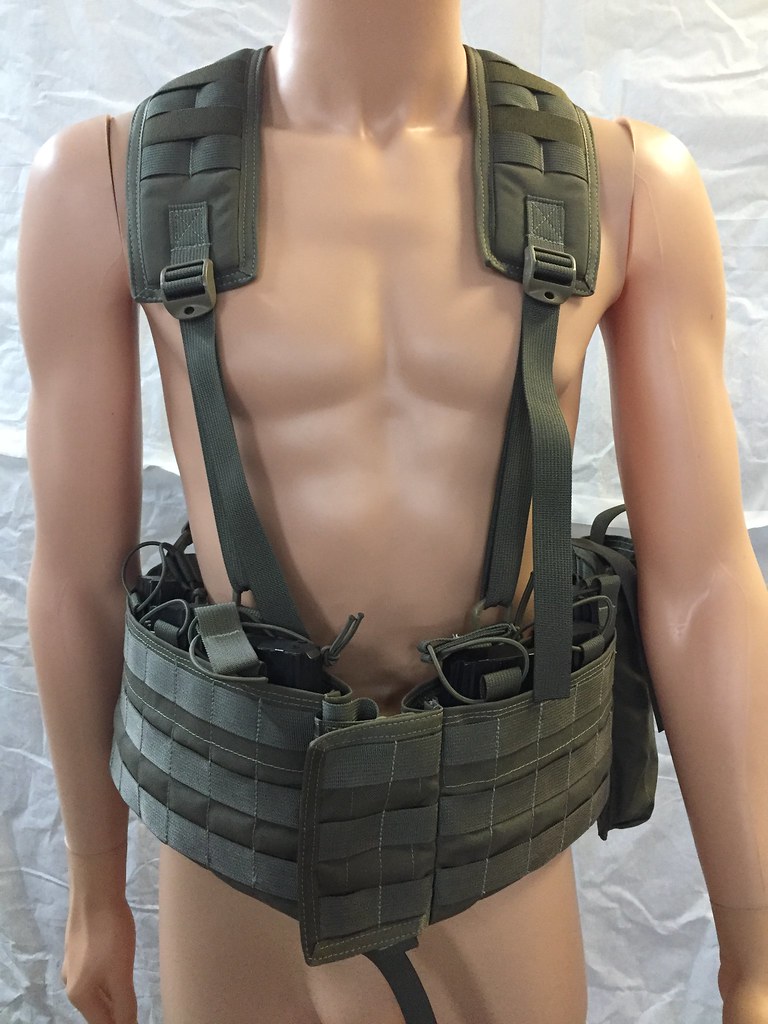
The whole rig is made with 1000 denier Cordura in ranger green, reinforced and with binding tape at all seams and edges. The shoulder harness is padded, with mesh lining and two channels of PALs as well as elastic between each row, to attach small items and route radio cables, hydro tubes, and so on.
The belt essentially extends all the way around, with a three-row PALS panel at the back. The belt and harness are held on with a six-point harness, much as the British PLCE. While there are a lot of them, all adjustments are set up for me to be able to adjust while wearing the rig, and I don't have any extra triglides or other retainers to lock the settings down.
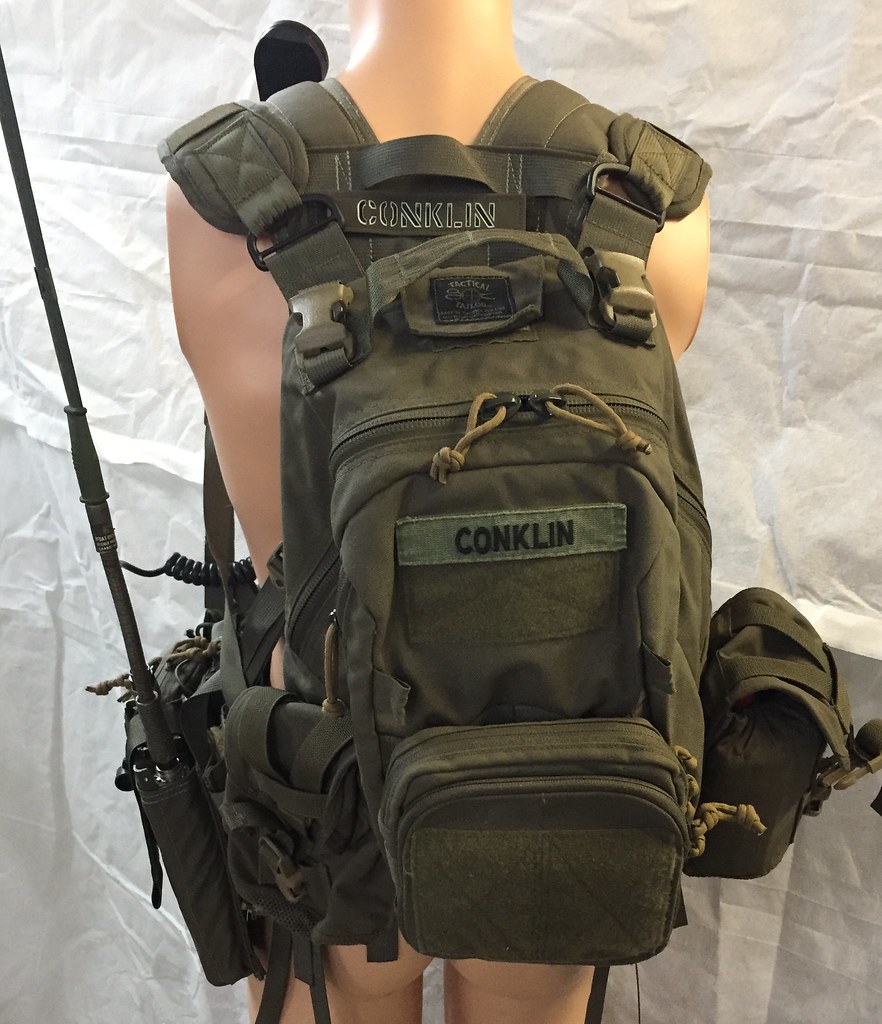
I am still deciding what to do with the upper and lower back panels. I may attach a small hydro carrier and buttpack, but since I wear an assault pack a lot, this may not be needed, and may get in the way.
The pack wears higher than this for real.
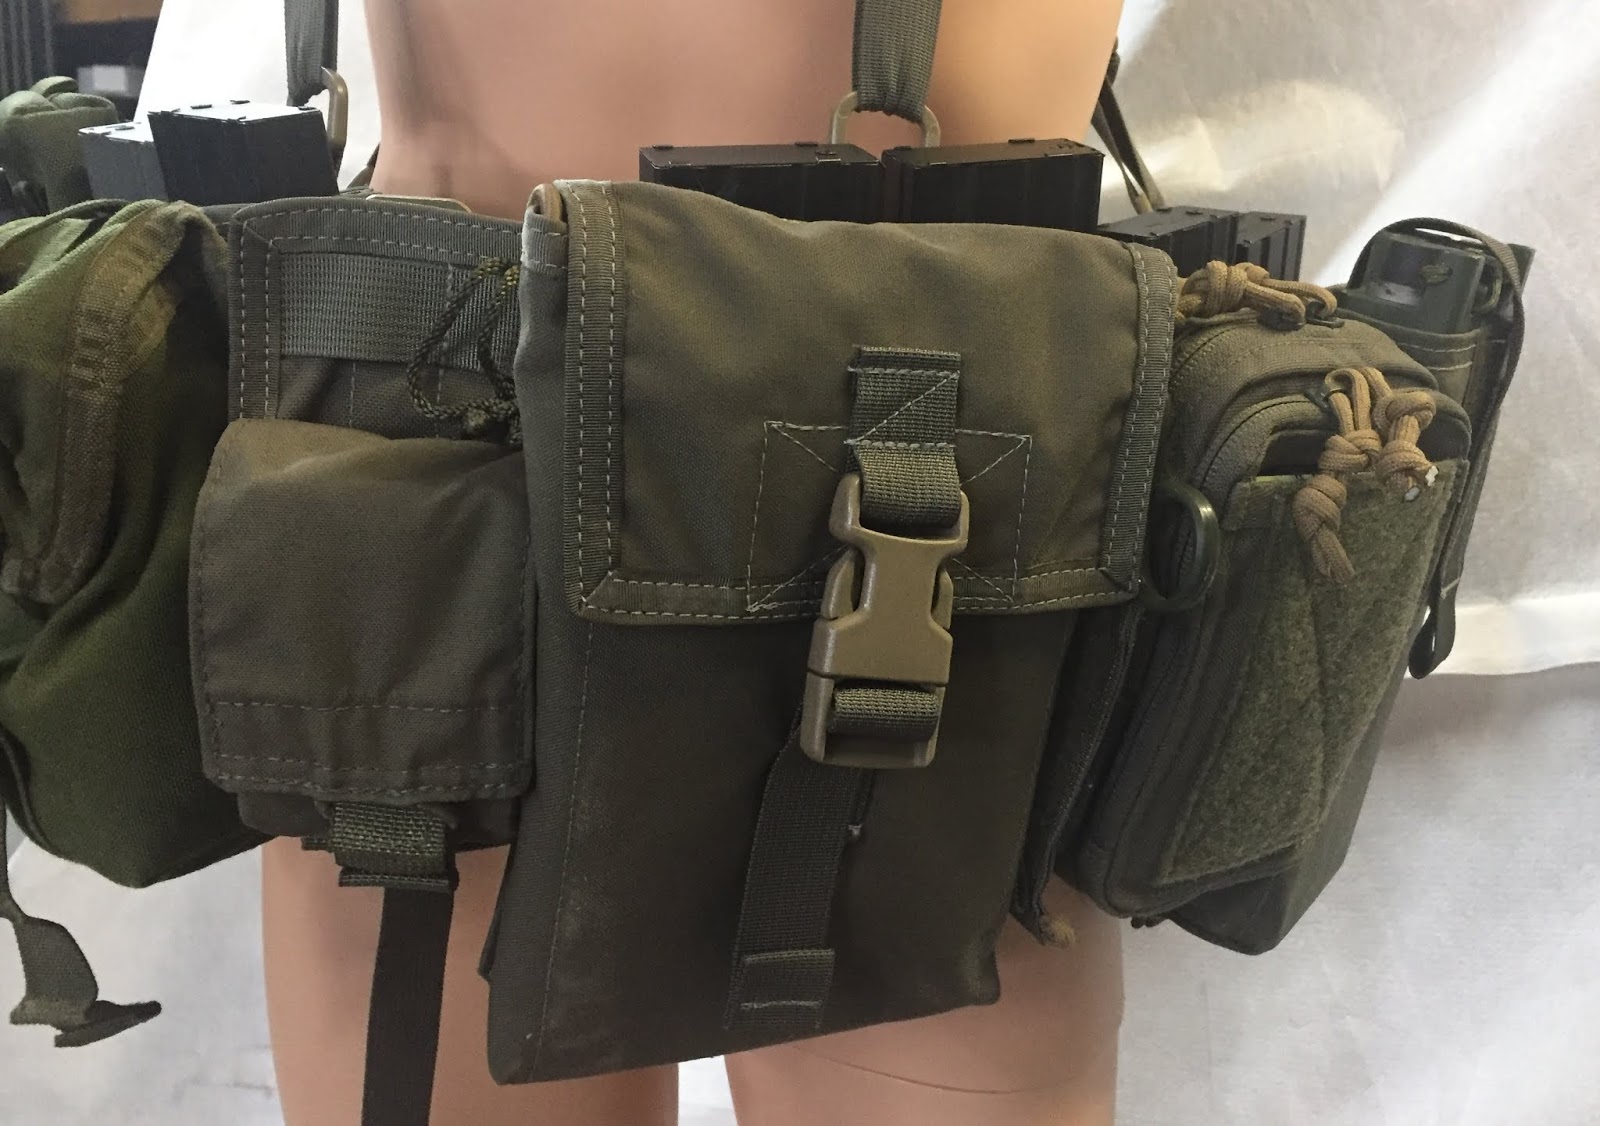
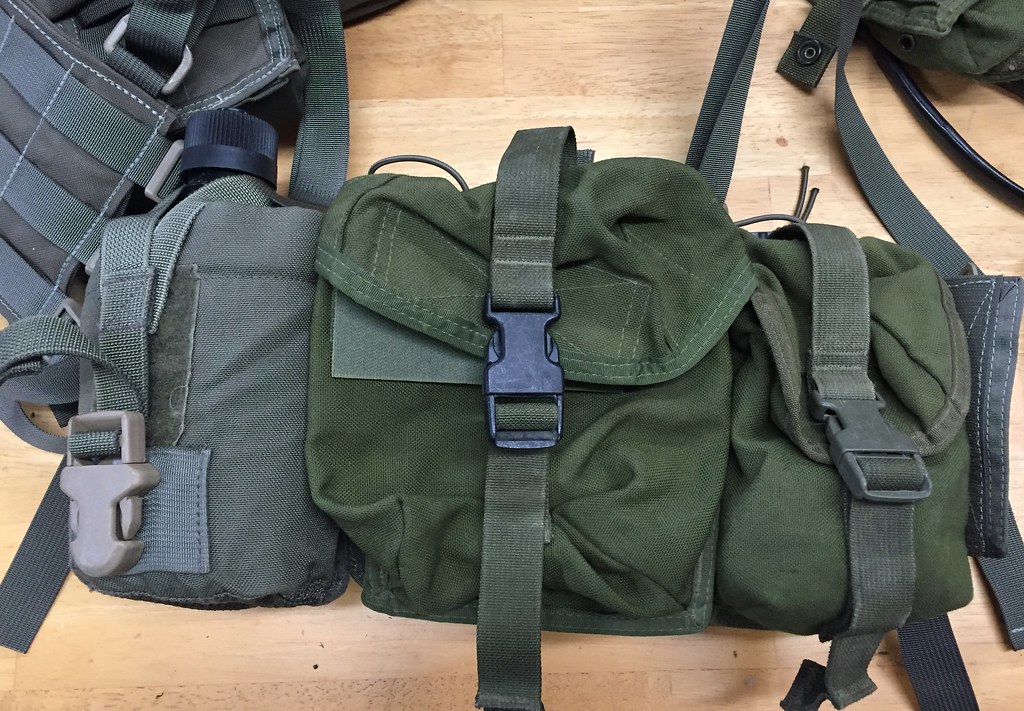
I also was interested in keeping the internal mag pouches as on the S.O.Tech, but wanted to be able to carry all mag types. He built this with an interchangeable system. You can put in inserts—three per side for 5.56 guns, 2 per side for 7.62. They don't fit too snugly in the slots, so you can choose how high to wear them, and how close to the centerline, trading security and comfort for ease of access.
The 5.56 pouches are pretty roomy, so can also hold AK mags as well. The 7.62 mag pouches are also not too tight, and work with FAL, G3, and M14 mags.
G3 mags, set lower to our left, higher on the right
FAL mags with magpuls, with the pouches set lower to our left, and higher on the right.
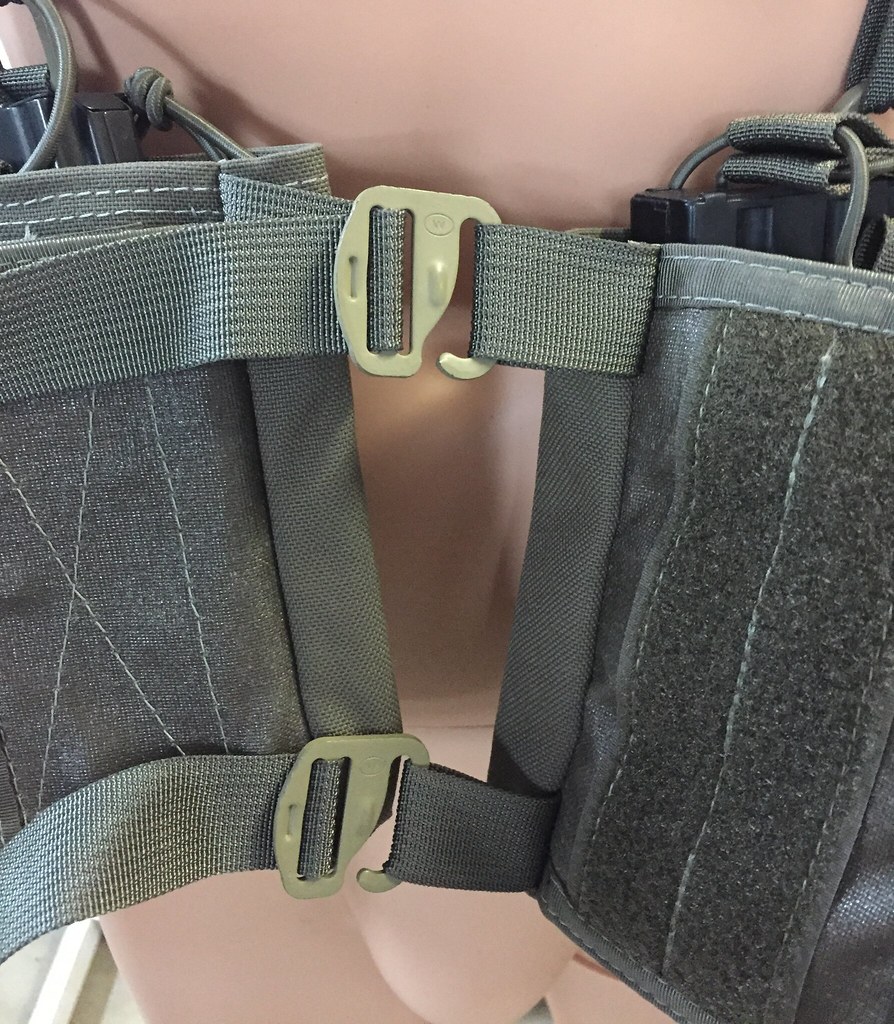
The front has a velcro-secured two channel PALs panel. Open that up and there are G-hooks to hold the two sides together. Much less distance than side-release clips, much like the First Spear Tubes, and other such solutions gaining traction now.
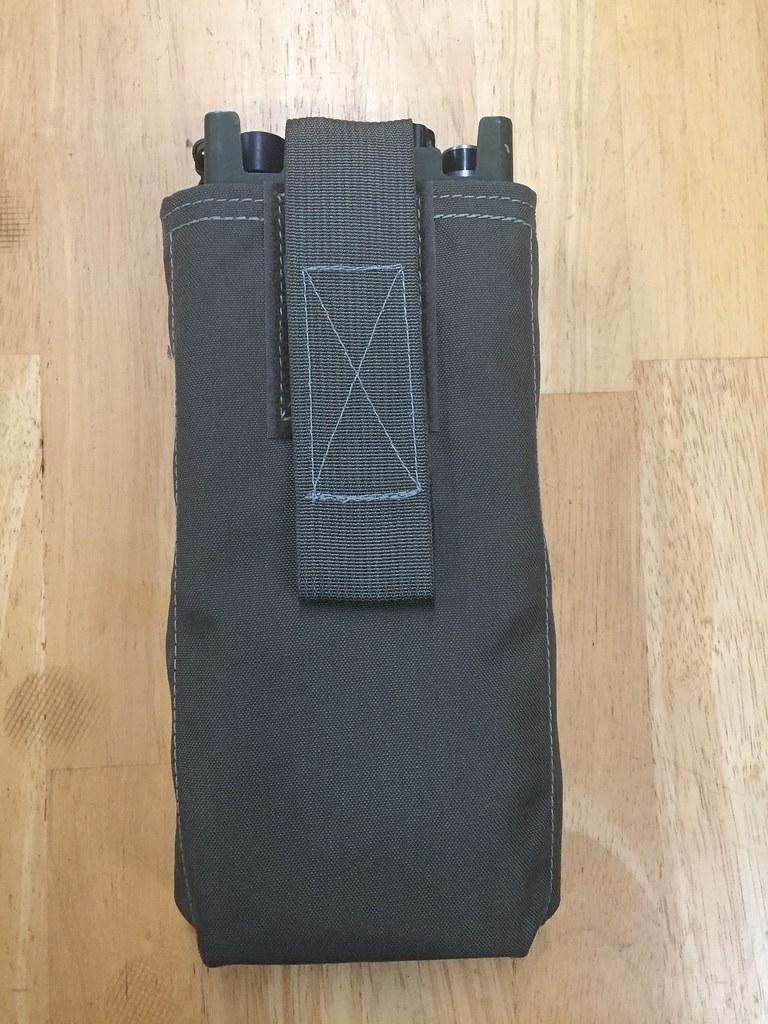
The PRC-126/128 is our CWG issue comms and pouches for those are not great. Most you can find are for ALICE gear, and while the later model USGI pouches that came with the RACK system are not terrible, they are not great. They have a simple top flap that makes it not super convenient to pass the cords or antennas, and you have to pop the lid to check or change channel or volume.
So, I also had him make a PRC-126/128 radio pouch with more modern features. It's open topped, and has plenty of room for top attachments to pass through.
Yes, we may be getting more of these made so tell us if you want to buy one for yourself.
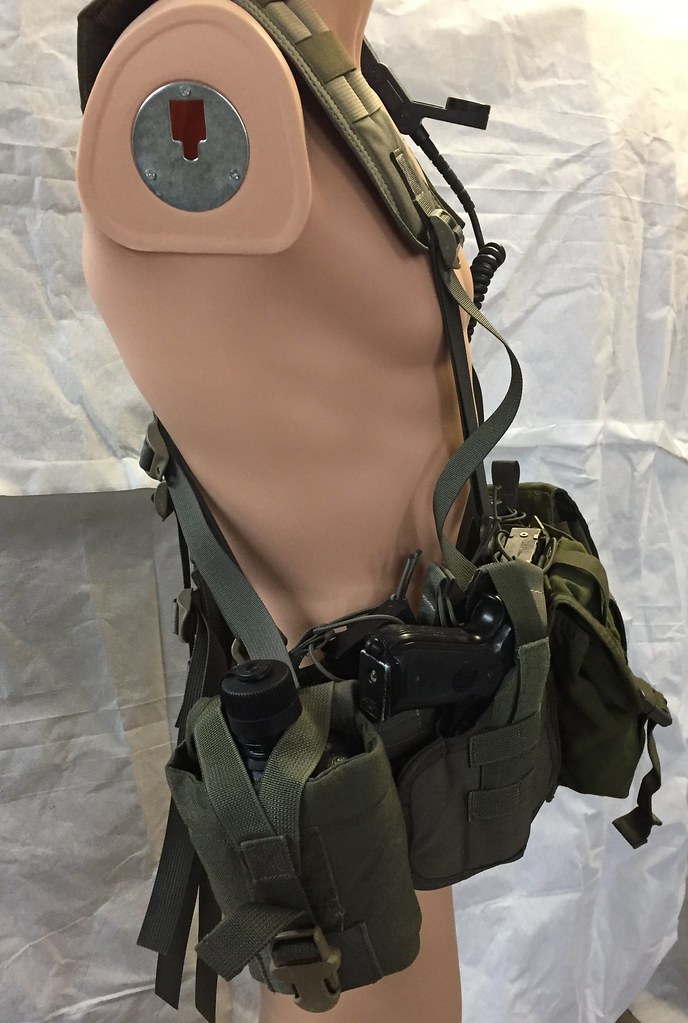
I have the rig set up with pistol holster on the right side now, but that can easily be swapped with a general purpose admin pouch, or likely a SAW pouch, like our beloved but hard-to-find Spec-Ops X6 as shown here.
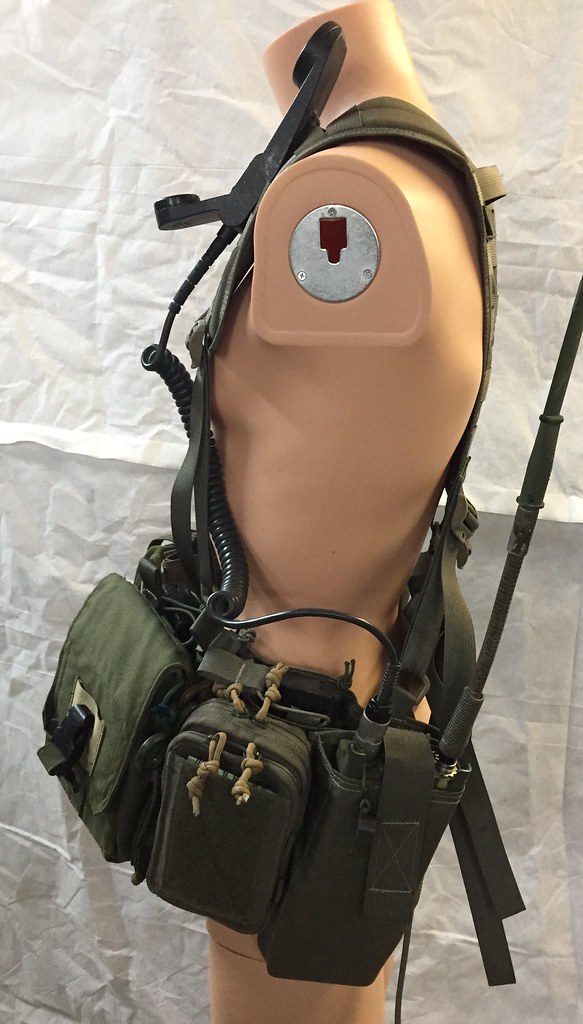
Starting at the center and working around to my right I wear: a compass pouch, general purpose pouch, pistol holster, and canteen.
As I said above, the back panel is empty right now.
Resuming on my left side, there's the radio pouch, admin pouch, and finally a pouch to carry my map case. I will be continuing to work with KND to have a purpose built pouch to replace that one shortly also.
So I now have a single rig that can fill most of the roles I need it to instead of having several rigs and doubling up on some gear, or swapping equipment from one rig to another as missions change.
I have recently found that Amazon Prime Video has a huge selection of obscure (to me at least) foreign war movies. Most interesting, is that many of them are from the other side of the Iron Curtain, things we couldn't see when they were first shown.
Some are awful, but some are fun, and others are classics. Today I want to talk about Westerplatte (1967). There's also a 2013 Polish movie on the same topic, but it's too angsty, too full of flashbacks, and uses bad 3D effects.
But the older film is wonderful. Guns are authentic to my eye as they are both Polish productions, and interesting to see as different from the usual US (or non-gun/airsoft gun). IMFDB page on it. They seem mostly properly employed. Lots of fussing with MGs to load them, to make sure they are moved to the best position all the time, re-water them!
People are yelled at to fire only short bursts. They even low crawl very properly.
The film even went to the level of making not everyone a hero. People broke after days under fire, or just decided they didn’t want to fight until an officer all but threatens to shoot them. Maybe worthy of the Mindset Quote thread (translated) is a day 3 discussion in the local HQ by the officers:
We talk about surrendering, while our men only worry if they have enough ammunition. Well, gentlemen, we have enough ammunition.
The battle itself is super interesting for reasons that are perfectly relevant today. The political situation was horrid. They were on a weird little bit of only nominally Polish land, with both land and sea on all sides from what was supposedly an open city.

Danzig was supposedly not really part of Poland or Germany, and had a police force but no army, but the Germans effectively occupied it, in a great example of peacekeepers not doing their job before the Canadians led the UN to generally figure out how to do this. Here's a close up of the Westerplatte peninsula. Danzig (modern day Gdansk) is mostly to the west.
This strongly misrepresents what a fortification consisted of, but is an easy to read simplified plan:
The League of Nations nominally enforced Danzig being open, but it was entirely toothless. And, too beholden to avoiding war at all costs, so appeasing and backing off, as we all learned didn't work very well in the end against the Nazis, or the Empire of Japan.
I am reminded of the UN mission to Rwanda doing nothing, and the French having to come and rescue all the Westerners, but leaving everyone else behind to die. Compare to Operation Unicorn, where French peacekeepers counter attacked and destroyed the entire Ivorian Air Force for an attack. Last year, UN withdrew from a peaceful Cote d'Ivoire; enforcing peace with force can totally work.
German Photo-reconnaissance from 1936 clearly showing many of the buildings
The garrison on the peninsula was restricted in size, and from having significant weapons, or fortifications. All because of a desire to not make the Nazis angry, and give them an excuse to attack. Of course we know now that lacking that, the Germans just made up an excuse when it was time to attack. The Polish Army even reinforced for a few weeks shortly before this, but had to withdraw under international pressure.
And to add to the awfulness, despite sea access and being in sight of Poland, it’s actually entirely cut off from friendly territory. Everything goes through the Open City of Danzig, which rapidly became effectively enemy territory. Not only is there no way to fall back, but supplies are restricted even during the build up.
Another photo-reconnaissance shot from 1936 showing where the New Barracks is situated (by the black arrow) and also showing the old ammunition bunker on the lower far right of the photo with the Old Barracks and Officers Casino about the half way mark on the extreme right of the photo whilst the Red Wall can be seen running the length of the photo.
Even the movie hits on this well. That logistics and the whole tail matters. The medical section complaining their supplies are held up in customs is just another dumb administrative thing to deal with before the war starts. But once the shooting is on, it means all your casualties stay that way, or die, because there’s not even enough dressings, much less antibiotics, surgical tools, or enough staff.
The same for backup radios and commo wire; from the first day they had to use runners to talk to outposts, are risking guys running more wire. And for most of the time they cannot talk to higher at all so cannot get clarified orders or more intelligence. Or, how to feed people once the kitchen is blown up because you expected that the big fort would be bomb proof. And a thousand other things that sap the ability of your men to fight.
Generally, it’s a good example of how individual bravery and the man with a rifle will do a hell of a lot, but artillery, air attack, and machine guns will often win out. The newsreel footage in the older film didn’t match at all, but I didn't mind as it as jaw dropping. Every gun on an battleship firing on the island at a range of about 150 m (really) is, even in grainy film, a sight to behold.
Above is a painting, but I like it.
The whole movie is also on YouTube for free, just start at the beginning instead of from this clip where the bombardment is.
I cannot imagine sticking it out in the face of that. And no one expected they would. The tiny, determined garrison was actually planned, at the national level, to only last 12 hours, and that was considered nuts, as it was up from a pre-no-reserves estimate of maybe 6 hours. If I haven't outlined enough horrible things they had to overcome then try this last add on for the tactical situation: The whole island isn't theirs. There's a wall down the middle, and Nazi soldiers on the other side.
Another aerial photo from 1936, clearly showing the Red wall running the length of the Harbour Canal and the Old Barracks in the extreme right of the picture edge
And not a fortification. A wall. like what you might separate your back yard from your neighbors. Here is it after the battle. Yup, it's about one layer of brick, and some wire on top.
A German posing for a shot by the ruins of the Red Wall
And yet, they lasted an entire week under those conditions. Imagine if they had even twice the manpower, better fortifications, and a dozen mountain guns to wheel around and blast the Germans with?
I bring this up not just to celebrate some really solid heroism, but because horrible situations happen, at small scales and large, for unimportant battles and key moments in history, all the time.
CWG events, and training, tend to focus on getting the basics right. Not just teaching and letting you exercise small unit tactics, or using fewer and unencrypted radios, or how to navigate with a compass. No, while we are happy to teach those, more important than knowing any one skill is understanding principles.
With those, you can react to loss of material, loss of mannpower, loss of communications. You can change and adapt to the situation, instead of waiting for direction from on higher, failing to take action because there's no fire support or air support, or just sitting there clueless while you wait for the Blue Force Tracker to get fixed.
I have been thinking much lately of waterproofing, and gear designed to work in constantly wet conditions. I got rained on a lot in Poland, almost constantly in Iceland, and then came home to many days in a row of rain.
Waterproofed
My rain gear has gotten a workout, and I have been re-waterproofing much of it to handle it better. Gore-tex doen't easily wear out, but the micro-permeable layer is on the inside. The surface of your jacket can also soak up rain, get heavy and cold, and be unpleasant. Periodically you need to re-waterproof your gear.
My favorite is definitely wash-in waterproofing. Nikwax TX.Direct Wash-in Waterproofing is easy to use, and the most effective thing I have used so far. I apply it to all sorts of stuff when it looses waterproofing. Tents, packs and pack covers, hats, and more.
Use the directions on the bottle for the amount, but I do not ever risk getting a waterproof washing machine, and just do it in a bucket or a sink. A spare sink or wash basin in the basement, not the kitchen sink. Agitate and rotate your gear so it gets evenly soaked, rinse it out, and let it dry fully.
The wash-in will be fine as it is. Use sprays (the matching brand usually, as it's the same stuff) to touch it up as it starts to loose waterproofing resistance over time, especially on high-impact areas like the sleeves and shoulders of a rain jacket, where the rain falls directly on you.
Water-Sealed
But not everything is or can be under a waterproof cover. One lesson of jungle warfare especially is that some gear has to just be able to tolerate wet conditions all by itself.
Sometimes this is you rifle, radio, optics, and electronics. They cannot live their life in waterproof bags, so need to be designed to accept being wet all the time, without leaks or corrosion.
Maintenance is an important part of this. Many of us may think of cleaning and oiling metal parts, but forget the plastic, electrical, and water-sealed components.
Every time a new electronic device comes to me, and periodically for maintenance or when they clearly need to be cleaned, I remove all battery doors and other removable panels. Many seals and panels get silicone to assure they do not stick, and gaskets or o-rings get white lithium grease. If possible, remove the gaskets and o-rings to grease both sides.
Without suitable lubrication, you won't be able to tighten the panels, seals won't move into place or can even erode and tear. Dry seals are not waterproof.
Electrical items, like the battery screw caps on your Aimpoint, need the same treatment, but we need to make sure the electrical contact work. Most of these devices pass electricity through the cap into the body of the device; corrosion can prevent this from working, but so can some oils and greases.
Instead, do the same treatment with dielectric grease. It's simply electrically-conductive grease, and works very well for this.
Water-Loving
The jungle has always been the worst environment, and lessons have been learned at great cost about the right gear to wear and carry, from the Philippine Insurrection right on through to today.
Of course we like to forget the lessons of the past, so almost everything learned from the Pacific campaign was lost by the time Vietnam rolled around, but since our various post-war jungle insurgencies, the US, France, the UK and others have maintained jungle warfare schools to keep the skills alive and push for suitable equipment.
While the jungle is the most extreme version of the relentlessly-wet environment, there are bits and pieces of it all over, which make their lessons very relevant. Many times I have been walking along a creekbed in Missouri that is covered in ferns and moss, with a layer of fog indicating 100% humidity. And it's like this all day, all year round.
For those environments, and for the periodic rainy seasons we get, we learn that some items cannot be waterproofed, or worn under cover, but have to learn to live with constant dampness. Slings, belts, and load bearing equipment are the tip of the spear on this front.
There are a few lessons in finding and configuring equipment for this:
Use materials that do not retain water. Ditch stuff like canvas, and avoid padding. If you must use padding, use hydrophic foams.
Allow water to drain. This is not just drain holes, but is more complex than you think; every time there are two layers of fabric, water can get trapped between them. If you have a waterproof fabric tube over a hydrophobic foam pad, water can still get trapped between the two layers. Mesh is a nice solution for many of these situations, but also just eliminate extra layers.
Never use anything that can corrode, or rot. Drain grommets are terrible things because they are metal. They clank, snag, tear off, and eventually will corrode.
Do not cover too much of the body. The soldier has to be not overheated during their work, or chafe from the wet fabrics. Chafing on long, heavily-loaded, wet runs will eventually move from discomfort to damage. Injuries from chafing can get bad enough that people in austere environments, without medical treatment, can die from them!
In the past, you simply couldn't meet all these requirements, so spent a lot of time making sure your gear could dry out, trying to apply waterproofing materials, cleaning them, and replacing worn bits. Or, they were so waterproof (vinyl and other rubbers) and heavy they were fatigue-inducing for the soldier.
Today, technology is not just more phone apps, but materials that give thrilling options to meet these needs really well. Lightweight synthetics like Hypalon, and many proprietary laminates are offered that have zero water absorption. They also are built in interesting ways, to reduce weight, complexity, and avoid padding and spaces which can trap water.
While several companies make such things, two leaders of note are Velocity Systems, especially with their Mayflower line Jungle Kit, and Blue Force Gear, which has a whole line of Helium Whisper pouches, and a line of Minus load bearing gear with laser cut slots and holes instead of MOLLE webbing sewn on.
(Note, Blue Force Gear seems to be discontinuing some of their Minus rigs, so if you want one, today is the time to get them while on closeout)
My Jungle Rig
I have used a lot of load bearing gear. ALICE, the SDS RACK, commie chest rigs, belt lines. A few years ago, I took that info, sewed my own, and it had some fun features but it got worn out so at the beginning of 2016, I started looking to replace it. Had some wish list ideas, etc. but I stumbled across a MACHS (a Hellcat Mk2 with extra pouches) for a steal, and wrote about that.
It had some relevant features which make it work well. A lot of the design is very nice to avoid chafing, or trapping water. The shoulder straps for example are wide webbing without padding. But it's still a little over-built, and despite some customizing on my part it cannot meet all my needs simply because it is a 5.56 only rig.
Jungle Kit
Recently, I went to a friend's store, and tried on a number of things to meet this need. I started with a lot of assembling and trying the Mayflower Jungle Kit. It was not me. But let me explain.
First: It’s nice. So nice that if you love ALICE or other belt setups I cannot suggest it more highly. It is very stable, very well built, and very light. And, meets all the other needs outlined above about comfort and water retention.
But I personally have settled very much to where I like to wear my rig (high) and know how belts work for me. They don’t much. The pouch bottoms stab me, and tilt, and snag on my ruck belt, and so on. I want a platform tall enough to mount the pouches TO, not hang them FROM. If that makes sense.
Front or Back Adjustment
The other thing worth considering is the overall layout. Both belts and chest rigs are of a fixed diameter. They have adjustable straps which allow them to fit your body — and which must adjust as you change clothing for the environment, have fat days, or choose to wear or not wear armor.
For belts, the adjustment is in the front. This is super convenient to adjust, but it means the fixed point of reference for the belt attached items is at your spine, in the back. As you adjust, items move to or away from your centerline.
For chest rigs, split at the front or not, the adjustment is in the back. While it can seem like you are wasting space with this gap, generally you can fill it with back panels — the hydro carrier is a common one. Anyway, on a chest rig, since the adjustment is to the rear, when your diameter changes, the front-relative position remains the same. When you reach for stuff, you find your snacks, pens, lightsticks, and magazines always at the same place.
Again, these are not bad things. Just choices. Your choice may very well be different from mine, and that is just fine.
SplitMinus
Being a cheapskate, I was thrilled to find the Blue Force Gear discontinued page, and immediately got a SplitMinus, and a few pouches. And over the past few weeks I have put together… this:
Because of the video I noticed the back upper straps weren't adjusted right, have fixed those. And the IFAK pouch is being replaced with something smaller.
For the record, as shown it is (my left to right):
10-speed 7.62. Gray for some reason I cannot recall, but once assembled I hit it with some Rapco Khaki paint. Works great. Carries anything at all. Can dump the mags when transporting the rig, so I added elastic cord, simply woven through the back of the rig cutouts and molle webbing. Knotting at each tension needed, so no noise from cordlocs.
Folding pouch from some UK pack. Roll top and velcro. Using it for pens, lightsticks, squinchers, etc.
SAW pouch. Also UK issue. On my other rig I have SpecOps X6, and ideally I'll get some Helium Whisper SAW pouches but at $80 a pop, not eager to do that. Left one here has velcro sewn to the top to hold the patch indicating that it has a (home-sewn) IFAK pullout.
Mayflower Jungle Buttpack (empty here and the straps stupidly hanging down) woven through the back 1" belt of the rig, and the D rings attach via the little velcro tab things to...
... a First Spear hydro pouch. Accidentally got the small one, but in the end, perfect as I get a little stowage below, and less weight in water above. A lot of times I wear an assault pack it's just to have backup bottled water and rain gear. Buttpack can handle those duties I think, lightening me up.
Another SAW pouch, empty. This is my Mission Specific Stuff pouch. Day optics, LRF, thermal, batteries, food, small water bottles, gloves, etc. It varies, but is a great solution for that, been using for years. Where the idea of the SAW sized pullout came from.
Bang pouch. I have none of those, but a few mini-smokes, and if those dry up will turn it into something else. Previously was on the shoulder so this is probably better use of the space.
And back around to the matching 10-speed 7.62
Not visible is: Nothing. A big benefit of these modern rigs is that there are fewer features! There is no inside pocket for example. I have never been able to use these properly. They are too small, only work with flat things, never have loops to keep pens and lightsticks upright, etc. And they do add weight, bulk, and trap water even when made of mesh. So good riddance.
I also did mod it to have tubes. The laminate they are using is NOT hypalon, so hypalon or vinyl glue techniques do not work. The tubes are in vinyl (either Tempur door scraps or FMTV cargo bed scraps… I cannot recall which) I tried some good glues and techniques and it was meh. Holding, but not trustworthy. So ended up sewing, and it sews like gangbusters.
The cordura (?) finish layer is nice for glare and noise, but it does soak up water pretty good. There’s not much of it, so it doesn’t get super heavy, but if was doing jungle or maritime stuff full time, I’d give the whole rig a waterproofing soak (stupidly, I just spent the weekend doing that to a bunch of other stuff of mine, forgot to do this…)
The laminate is very shape-supporting. It doesn’t compress and fold up and squish like fabrics. Putting the repair tubes into the slots I glued/sewed was a bear. Very doesn’t work like fabric/webbing loops. Even more so, when you just wear it around; the SR-attached front was nothing to write home about, but with the tubes, the whole mountable panel is rock solid. The rig is now not hanging off me, but as I have always liked (and gotten my home-sewn ones to do especially) is practically bolted to me. Nothing wobbles, and everything is where I expect it to be every time I reach down.
So, who is ready to ditch ALICE, cotton canvas, and old "bombproof" cordura things? What rigs are you running, and how are they going?